
Thursday, December 26, 2013
Wednesday, December 4, 2013
MAKE ART THAT SELLS 2013 -BLOG TOUR!
I took part in an online illustration course by Lilla Rogers called Make Art That Sells, Part A.
Over a 5-week period we covered 5 projects in five different art markets:
1. Bolt Fabric
2. Home Decor
3. Wall Art
4. Children's Books
5. Giftware
Here is how each week goes.
I am giving you Week 1 as an example.
Monday:
We were asked to do a "Mini" assignment of researching and quickly moving on to sketching on an assigned topic. For the first project, we had to sketch a variety of berries of our own choosing. I found myself drawn more to plants with clusters of tiny berries rather than the kind you normally find in the supermarket. I may have drawn 4-5 pages of berries but I liked this page the best.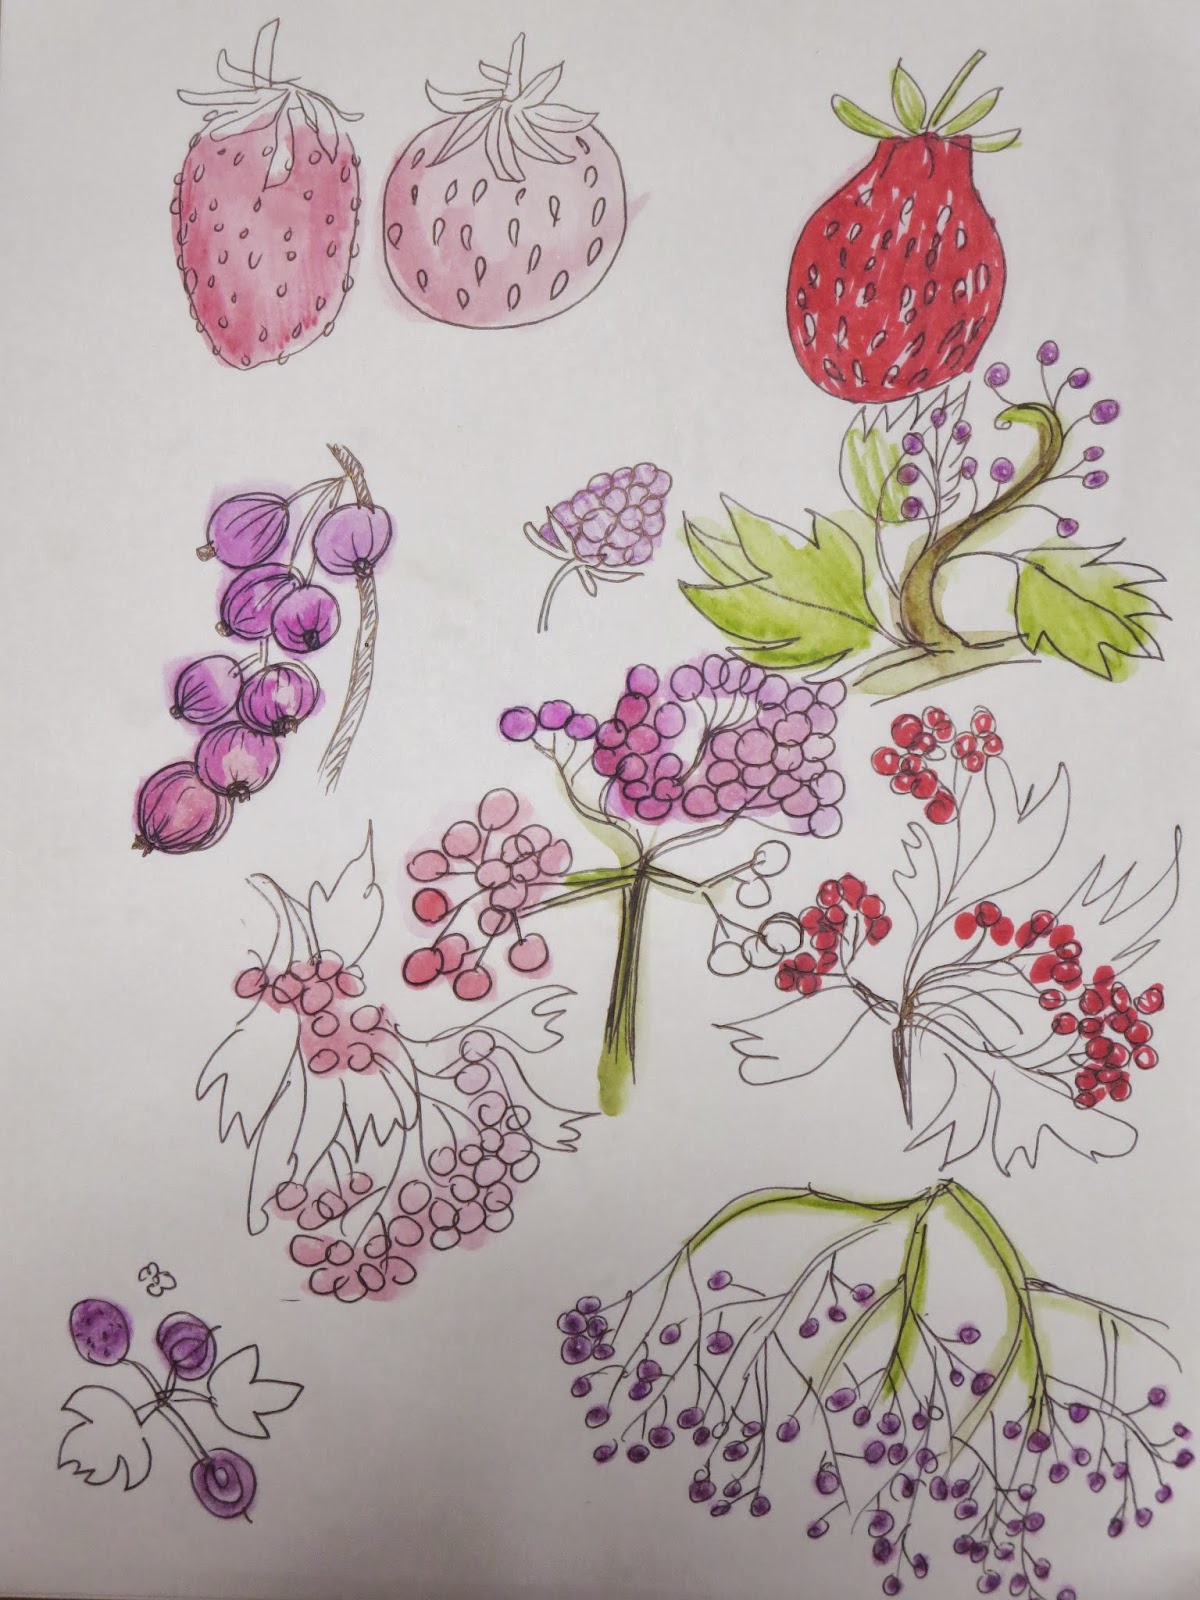
Wednesday:
When Wednesday came, we got the actual assignment. For week 1, it was to sketch vintage casseroles and use them with the berries in a bolt fabric design.Here is one of many pages of sketches of vintage casserole dishes with berry patterns on them. I spent too much drawing this (6 pages worth!) but this was so FUN that I couldn't stop. I like the colors and patterns (based on blueberries) in the bottom left corner of this page the most.

By Thursday evening I started to realize that deadline was fast approaching and I was nowhere near being ready to make a bolt fabric design. I didn't have any idea how I was going to translate my sketches into a finished digital piece! This is when I realized I might need to study and learn more about art techniques and making good use of Illustrator and Photoshop.
I went online to our Facebook group and saw some of the rough designs from other students in the course, and I started to PANIC!!!! Had I completely mis-understood the assignment?!! They all had cute designs with lots of OTHER icons in their work besides the berries and the casseroles. All I had in my designs were berries and casseroles. Period. What to do?!! What to do?!!!
So I decided to re-do my design entirely in a digital format, scrapping all my sketches and colors that you see above, and over the next 2 days made an entirely new design by hand in Illustrator. No sleep. Lots of coffee. Did I tell you I work a full-time job? I had no time to cook dinner because I was rushing to get my homework done!! Ugggghhhhh!!!
Sunday:
Our final work was due on Sunday. We were to incorporate our drawings, sketches and paintings into a pattern and save one digital image as a JPEG image that we had to post in an private online forum. Below is my finished bolt fabric design. I went with a Retro-Japanese theme, choosing Japan-inspired colors, and adding icons of tableware which I personally want to buy but can't afford.

Mistakes I Made:
1. Missing the Deadline: I worked hard and at a fast pace in order to get my work in on time, but somehow missed the deadline by a minute or two (thanks to international time differences and possibly also variances in what time my clock is set at vs. what time Lilla's clock is set at. Boo!!!! ) While I was very disappointed that my work would not get seen by Lilla this first week (because I didn't meet the deadline), I still felt like I benefitted from having had the chance to do the work and learn more about what it takes to work in the field of bolt fabric design.2. My Software Skills Might Need Some Work: Ok, I will admit here that I have a 4-year degree in Graphic Design and have been using Photoshop and Illustrator in a semi-professional aspect for over 20 years! But I have spent the last 20 years doing design on the side while working in a different industry, so I have never needed to dive very deeply into either program before. Add to that, I have never used either program for ILLUSTRATION work before! I am learning quickly that the skill-sets for these programs for Graphic Design (layout and getting set up for print) are not the same as for creating illustrations. I need to study more!!!
3. Analog vs. Digital Illustration and a Combination of the Two: This course was the first time having to somehow get artwork done with markers, pens and paint into a finished design. Up to now I have always researched, sketched, and then created the entire design in some combination of Photoshop/Illustrator and would have felt confident that I had done my best work. But here I was doing work by hand and now felt lost as to how to make that into a pattern for cloth that would look as "finished" and "neat" as work that would have been done in an entirely digital format. I think I wanted the design to be "perfect" in the sense that there were no rough edges on the icons, and icons that were perfectly symmetrical, etc. I feel REALLY uncomfortable just scanning hand-painted work for some reason. Maybe because once I scan in a painted piece, the amount of work it takes to change or correct colors and clean up mistakes in a scanned image in Photoshop is HUGE compared to changing colors and shapes in vector work in Illustrator. With illustrator it's click-click-click and it's done! With Photoshop, I am there for 2 or 3 hours erasing, lasso-ing, playing with layer opacity, etc. I am starting to sense that maybe I don't like Photoshop as much as I thought I did. Haha!
Why You Should Take This Course:
Start where you are.
Wherever you are right now is the perfect place to be for YOU.
You know how you can make this hard for yourself?
By telling yourself, 'I'm no good. I can't do it. My work is not as good as the others.
You how you can make this easy for yourself?
By not spending too much time thinking about it.
By doing what you do well, and just keep moving forward.
Lilla Rogers is a truly amazing motivator, and for this alone, you need to take this course!!!
2. Behind the Scenes Industry Information: While we were all busy working on our projects for the Sunday due date, Lilla was busy putting up posts about the bolt fabric industry, telling us not only how to work in this market, but also about who the buyers are, what they are looking for, and how to make professional presentations of our work in order to sell our art in the bolt fabric market. I was SOOOOOO impressed with amount and quality of industry information given during this course, that I felt really, really lucky to have found out about this course from a fellow artist friend!!
3. Making New Friends: I live in the countryside in Japan. I have very few friends here, much less any ART friends here. Being in this course with so many other artists made me feel like I was part of a little art family! Everyone supported each other on the Facebook page, giving comments and feedback, helping to choose colors, offering virtual High Fives, and comforting each other when someone got too stressed. So many decided they didn't want the fun to end and vowed to stay on the Facebook page and keep making projects and supporting each other for the next few months. All I can say is that being a part of this group has really opened my eyes to what is possible as far as making a living with my art, and I feel like I have found my tribe! I am so thankful to Lilla Rogers and all the other artists in this course for their support and encouragement over the 5-week course and I am looking forward to learning in Part B of this course in Spring 2014.
In Summary
I highly recommend this course to anyone interested in working as a professional illustrator. I won't kid you, it is a fast-paced course with one project completed per week, so you REALLY have to make time for it on a daily basis, making your illustration work your priority in order to get the most out of your experience. Staying off Facebook and the Internet, not watching TV, etc. will give you the time you need.
Should you become unable to complete a project due to outside commitments, no big deal! You can post your finished work later on the Facebook page and get feedback from other participants. And even if you aren't able to complete ANY assignments, you will STILL gain SO MUCH from this course! Incredible new friends and contacts on the Facebook group page, new techniques and approaches from seeing others' work, and top-notch "insider" industry information (and even actual sales contacts!!) from Lilla Rogers herself. The best part of it all for me was that Lilla Rogers was incredibly supportive, kind, generous, and knew just what to say to calm everyone's nerves, keep us positive and moving forward. She really made us feel like we could do it. She is the best cheerleader an artist could ever have.

Here are some links to other blog posts about the Make Art That Sells (MATS) e-course:
http://www.jaillustration.com
http://antjeart.com
www.ghostkitten.com
http://jennartdesigns.blogspot.com
http://groovitydesigns.com
http://eva-marion-seyffarth.blogspot.de
http://nicsquirrell.blogspot.com
www.crouchriverstudio.com
Monday, June 17, 2013
Clover as a living mulch.
 Last Fall I walked around the yard tossing clover seeds into the walking paths between rows. This is the Masunobu Fukuoka method of "do nothing" farming, in which we let nature do the work for us. The clover eventually sprouts and becomes a living mulch, suppressing future weeds.
You can see in the photo below there is some clover in between the beds. Scattering by hand is not very efficient because the seeds tend to land in a one spot rather than actually scatter over a wide area. I still have spots with weeds this year, but the places where the clover landed are 95% free of the grass that was there last year. The grass normally will get to be waist high and needs repeated cutting throughout the year, so you can see why clover, which grows to only 3-40 cm high, is a time-saving technique. Clover also feeds the soil with nitrogen, is easy to remove, can be tilled under to provide green manure for the soil. Because it keeps the soil cool and moist, the worms and other soil organisms are very happy. And the bees are delighted by all the flowers. Win, win, win!!!

Sunday, June 9, 2013
Garden Update: Third Week of June 2013
For the past 3 years, the weather has been really messed up. Winter was much longer and cooler this year than usual. Like last year, we had a long winter, with only couple weeks of Spring-like weather, and then suddenly it was Summer. This month it's been like that, but with very cool nights. It's hard to know what to expect each week. But for now, this week will be sunny or cloudy, and I plan on logging as many hours of gardening as I can after work each day!


So here's what I have achieved over the past 4-5 weeks:
1) Weeded nearly a third the yard (by hand- pulling tall weeds up by the roots!)
2) Cast clover seeds all over the yard. Clover makes a great living mulch!
3) Cut the grass - the ENTIRE yard!
4) Planted: purple, yellow, and regular sweet potatoes, a variety of colored and regular potatoes, corn, edamame, pumpkins, Japanese cucumbers, pickling cucumbers, Italian Roma paste tomatoes, Italian cherry tomatoes, yellow/orange/red/black cherry tomatoes, sunflowers, basil, various lettuces, cauliflower and broccoli, sati-imo potatoes, green and yellow zucchini, spaghetti squash, okra, goya (bitter gourd), 2 sizes of hyoutan (bottle gourds) and hechima (sponge gourd), watermelons, green melons, yellow melons, red melons, ginger and myouga (not sure how to translate this one).
5) Built a new Hugelkultur flower bed, and started another Hugelkultur bed that needs to be topped with soil and planted.
6) Planted a flowering tree.
7) Starting laying out markers for raised flower beds at the foundation of the house. Measured some wood for cutting. Hoping this can be built this week!


Garden Update: Second Week of June 2013
Ok, I have not really blogged about this year's garden for a few reasons.
One: By the time I think to take a snapshot of my work for the day, it's already dark. This is the MAIN reason I have been updating Facebook about my garden accomplishments without any photo attachments. Normally I work way past dark. Meaning, I use every last bit of sunlight as the sun is going down to get my gardening done,often shoving plants into the ground while squinting to see, and then, as the light is waning and while I can JUST still see (usually the moon is already out and quite bright) I will be watering in the plants or seeds in the bed I just finished. The sun starts to go down around 7pm or so, and I am not "done" until around 8pm.
Two: I often forget to go out the next day and get a snapshot, but I am getting better at remembering to do this. A couple of Facebook friends have been saying things like, "Show us photos or it didn't happen!" and "Blog it or it didn't happen." Just so you know, THIS POST IS FOR YOU, J.C. and V.K.!! Now I just need to remember to update my blog!
Three: I am growing organic vegetables (mostly by experiment and on a learn-as-I-go basis) on too much land (about 400 tsubo, or around a 1/4 acre) all by myself (husband gave up helping long ago) while working full time (and I am always frustrated that I don't have enough time for gardening). It is hard keeping up with everything. I wish I had a neater, prettier garden. Currently, it's a jungle out there!

"Mini" cucumber plants that I was lucky to find at the local home center are interplanted with green onions (1 on each side of the cucumber plant) as well as nasturtiums (the red flowers you see here). The onion's smell confuses or wards off bugs that like to eat cucumbers. The nasturtiums serve to trap any beetles that like cucumber. Apparently they like to eat nasturtiums even more?

I've tried growing onions for the past 3 years. They take up a lot of valuable space in the garden, and my soil is not rich enough to get big fat onions like the ones you buy at the store. I am thinking to give in and just buy onions form now on, as they are so cheap in late Spring. The down-side is, those store-bought onions are grown with petrochemical fertilizers. We eat a lot of onions at my house. Way more than I can grow myself. I always end up buy a lot (a couple of large boxes- kilos!) even when I grow my own. Sigh.

On the bright side, here is a close-up of a mini-cucumber forming. I bought lots of plants because I will be making all of them into natural-fermented pickles. Yum! They are made using filtered water and natural sea salt. The Lactobacillic Acid that forms makes them ferment and become sour. When they are ready to eat, they need to be kept in the refrigerator as there are no preservatives and they are not heated and canned (which would destroy the good bacteria) like store-bought pickles. Does anyone want to try some?

Here we have 3 small beds that, rather than till with the tiller and re-shape, I decided I could get away with just hand-pulling the weeds out and hoeing the beds for a "no-till" area of the yard. I've been moving more and more to "no-till" beds as I've read it's better for the living organisms in the soil and reduces weeds (more on why in a later post). I've planted "sati-imo" and ginger here. I won't need to bother with these beds for several months, unlike in the front yard where all the tomatoes and cucumbers are. I need to check those beds every day.

From time to time I stop to catch my breath while weeding or planting, and have a chance to look around and appreciate my work. That's when I notice the plants have been putting on flowers are getting closer to bearing fruits (veggies). Can you guess what plant this flower is from? It's an eggplant blossom! It's interesting that the stems are purple, the flowers are purple, and the skin of the fruits are purple. That's me standing over the flower, trying to angle my iPhone in for a close-up.
Tuesday, June 4, 2013
My morning Smoothie
Most mornings I have a huge Smoothie for breakfast. There are all kinds of recipes out there for Smoothies, but I like to use what I have and experiment. Here's how I make mine.
 Yes, those are some very brown (and very sweet) bananas. The inside was perfectly fine. I add fruit for natural fiber, sweetness and vitamins, and veggies for nutrients such as protein, calcium, fiber, etc. I try to sneak in at least half a carrot and/or half a cucumber, plus a stalk or so of celery, and a fist-ful of leafy greens whenever I can. Sometimes I can vaguely taste the celery or cucumber in the background, but over all it's the fruit that you can taste and smell the most. Note: The lemon is peeled and the whole fruit (without skin) is added since I am making a HUGE jug of smoothies (makes 4-5 servings). Please adjust to your recipe. 1/4 or even 1/2 of a peeled lemon may be all you need. Too much makes it very sour!

My smoothies are always Vegan (no animal products such as milk, yogurt or honey). I mix all this with cold water and ice cubes during the Summer. In cool months, room temperature water seems cold enough.


My smoothies are always Vegan (no animal products such as milk, yogurt or honey). I mix all this with cold water and ice cubes during the Summer. In cool months, room temperature water seems cold enough.


After blending to a smooth texture, I add some SUPERFOODS. In this case, alkalinizing Chlorella for cell detox, some Midori Greens (I love the mild taste and it has so many things in it!) and a tablespoon of energizing Chia seeds. The Chlorella is the "Secret Ingredient" that make my smoothies the color of the inside of your cousin's baby's nappy. However, I can vouch that my smoothies actually taste like apples or bananas, or whatever fruit I have on hand that day, no matter what this may look like to you! It's all apple-banana flavor AND smell- promise! :)

A view from them top. Looks good!

This smoothie was very thick. I make them thick if I am having them as a meal replacement, or if it is a cooler day and I feel the need more something substantial. I have made thin, watery smoothies as well, which taste better on very hot days in the Summer time.

And voila! I've posed my drink next to the persimmons I used in it for comparison. The chlorella powder does a great job of dying nearly everything a vivid greeeeeeeeeeen color but I assure you the taste is very fruity and delicious!
My recipe changes every few days or every week, as new fruits of the season become available. Some days I have strawberry-apple-carrot smoothie, and some days it's orange-apple-carrot smoothie. I like to make them not only by taste, but also by color. If I am feeling the need for a very RED or ORANGE color, I will NOT add Chlorella powder, which would ruin the lovely color of the fruit!! IN that case, I might add some other type of (not green) SUPERFOOD such as hemp seeds or flax seeds for extra ooomph!!
So, what would you like in YOUR smoothie?
Sunday, January 13, 2013
Last week I made Vegan Chilli.
It seems like everybody I know was making Chili last weak. I made a huge pot of this Vegan Chili and it lasted me all week long! The "meat" is soy protein crumbles (TVP/TSP).


And here's the recipe I used: Vegan Chili
Meatless Monday Challenge!
I decided to participate in a weekly "Meatless Monday" challenge. It's only a week late, but here's last Monday's food:
Breakfast = a green smoothie made with apple, banana, kale, lemon, and other fruits and veggies.

Lunch = Mikan, Salad with boiled veggies and avocado (homemade vinaigrette), and homemade Vegan Chilli

Dinner= I had the same Vegan Chilli with brown rice for dinner. It was nice and hearty!
Breakfast = a green smoothie made with apple, banana, kale, lemon, and other fruits and veggies.

Lunch = Mikan, Salad with boiled veggies and avocado (homemade vinaigrette), and homemade Vegan Chilli

Dinner= I had the same Vegan Chilli with brown rice for dinner. It was nice and hearty!
Monday, January 7, 2013
It's time for a change.

It's the start of a new year, and the start of a new me. I'm making this year the best one I've ever had, because I'm working on myself, loving myself, respecting myself, and enjoying myself. For starters, I'm dedicating this year to getting healthy in every aspect of the word! There's nothing I can't do if I have the health and energy to do it. But there's NOTHING I CAN DO if I am tired, in pain, and unhappy with my body! So here's my plan:
- Daily Smoothies for breakfast and as snacks.
- Cram as many kinds and colors of veggies as possible in each day.
- Experiment with Vegetarian, Vegan, Macrobiotic, and Raw Food recipes.
- Exercise!! Exercise!! Exercise!! (several times a week)
- Give my self permission to do the things I love without regret! (art, gardening, friends, etc.)
- Spend more time with friends!
- Cultivate a positive attitude!
- Actively listen to my body!
- Start meditating to calm my mind.
- Let it go. Let it go. Let it go!
Subscribe to:
Comments (Atom)